Hey All, if you’ve read our previous comparison posts on BigRock vs GoDaddy and BigRock vs HostGator India and decided to make BigRock your hosting provider then this new post is for you. This post highlights how to install WordPress on BigRock in under 5 minutes. Thus, check out this guide and install WordPress on your domain now!
BigRock is one of the most sought-after web hosting service provider in India. It is known for its experience in the latest technology and offers excellent customer support service.
It also provides a range of hosting and domain name services that are economical compared to other web hosting service providers.
However, apart from these, another benefit that you can avail is the best BigRock WordPress Hosting.
WordPress is a popular content management system used for blogging and the web. Also, since installing WordPress is easy it makes it well loved by both new as well as existing users. For more information on BigRock, check out this comprehensive BigRock hosting review.
In the below video, we have explained how to buy domain, hosting and install WordPress under 5 minutes on BigRock!
After watching this video, everyone, including the non-technical people, will be confident enough to create a WordPress website using BigRock services. We have attempted to keep the entire process as simple as possible.
So Watch Now!
Grab upto 50% Off on BigRock Web Hosting. (Limited Time Offer!)
Also, below is a step by step guide on how to install WordPress on BigRock, either manually (using BigRock control panel) or by using the one-click install system. The below guide can help beginners as well as advanced users alike.
How To Install WordPress on BigRock Under 5 Minutes?
Learn all about how to install WordPress on BigRock using the cPanel in under 5 minutes. This article includes a video of how to install WordPress and buy hosting & domain from BigRock. It also explains how to install WordPress manually through exclusive screenshots. Thus, check out this WordPress setup guide and go install WordPress on your domain right now!
#1. Install WordPress Using Softaculous
After you have purchased a web hosting from BigRock (hope you used BigRock hosting coupons), you’ll receive an email with your hosting details.
These details include your FTP details, BigRock login panel details (Control Panel) and BigRock Name Server details. Write these down in a notepad and follow the below WordPress installation step by step guide.
How To Install WordPress in cPanel
-
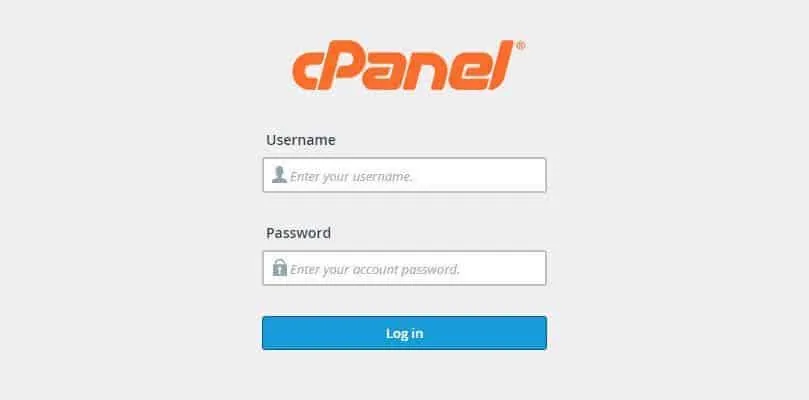
- Step 1: Log into your BigRock cPanel account.
-
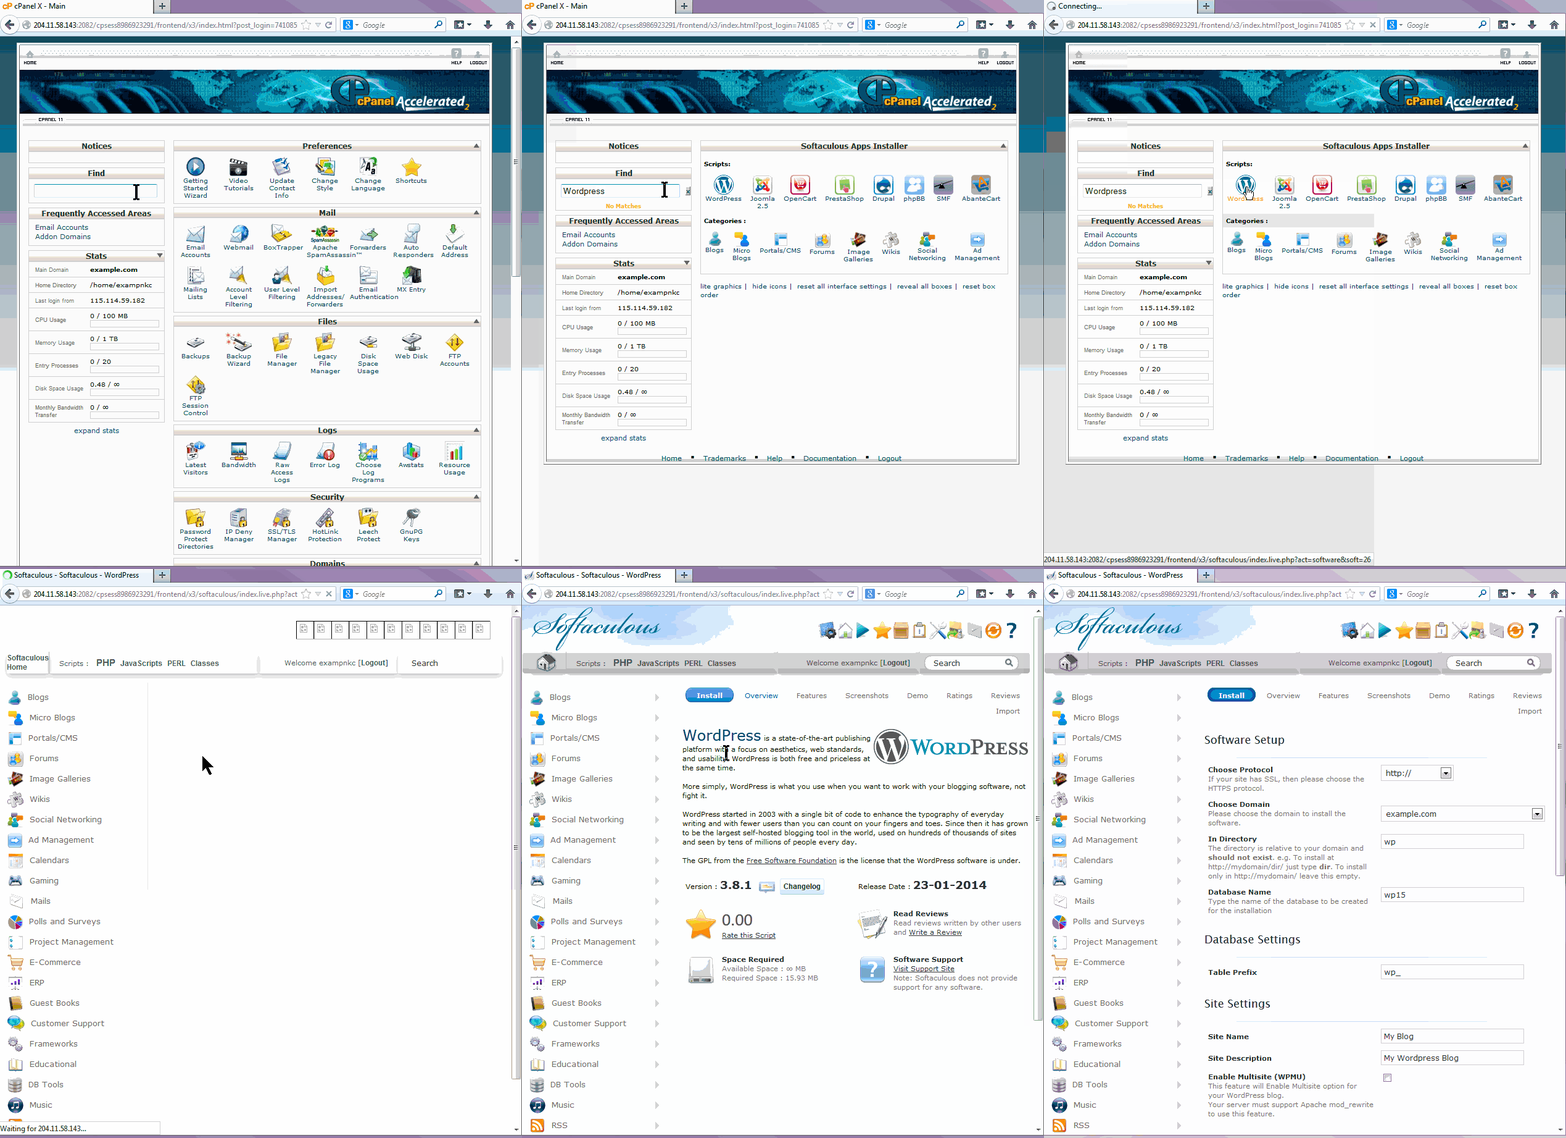
- Step 2: Search for and click on the WordPress icon. This will take you to the BigRock Softaculous Installer page. Here, click on the “Install” button.
- Next, fill in the required fields in the Software Setup. Select the protocol of your website; if your website has an SSL certificate then select the https:// protocol. Enter your domain name and the directory where the WordPress needs to be installed.
- Set your website’s name and description (Site Name and Description) in the Site Settings.
- Set the admin username, password and email id. All of these will be used to access your WordPress account in the future.
- Lastly, select the Limit Login Attempt plugin. This is a security feature which will help to keep your account in check. Add your email id where you’ll receive your login details and click on the “Install” button.
That’s it!
With the super-fast BigRock cPanel, it will take a few minutes to get the WordPress CMS to be installed. After installing WordPress, all the details you provided earlier will be sent to your mailbox and you are good to go.
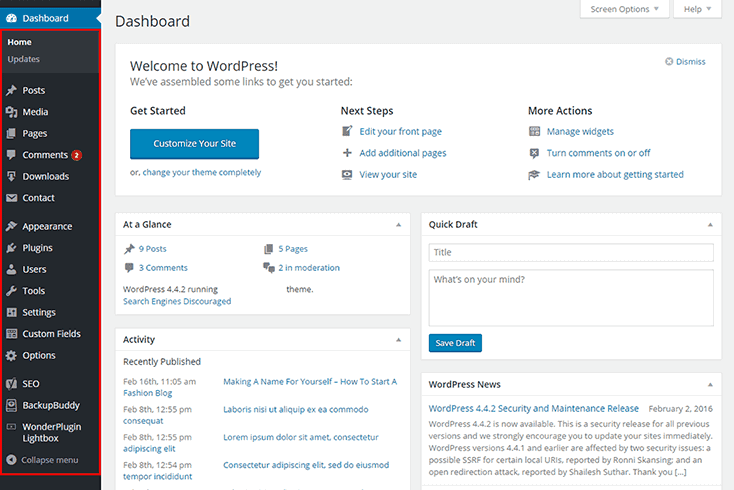
You can then click on the link provided in the mail, enter username and password to Log into WordPress dashboard.
Here’s How Your WordPress Dashboard Will Look Like.
#2. How to Install WordPress Manually on BigRock
Most people might wonder why there is a need to install WordPress manually when there are scripts like Softaculous that take care of WordPress installation. Well, to put it simple words, it is never a waste to learn how to install WordPress manually. So, let's begin!
How To Install WordPress Manually
To manually install WordPress, you’ll, first, need a couple of things to get started.
-
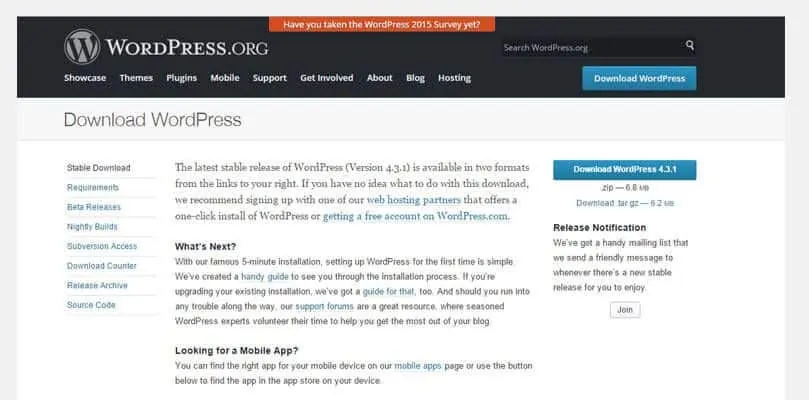
- Download the latest version of WordPress on your desktop.
-
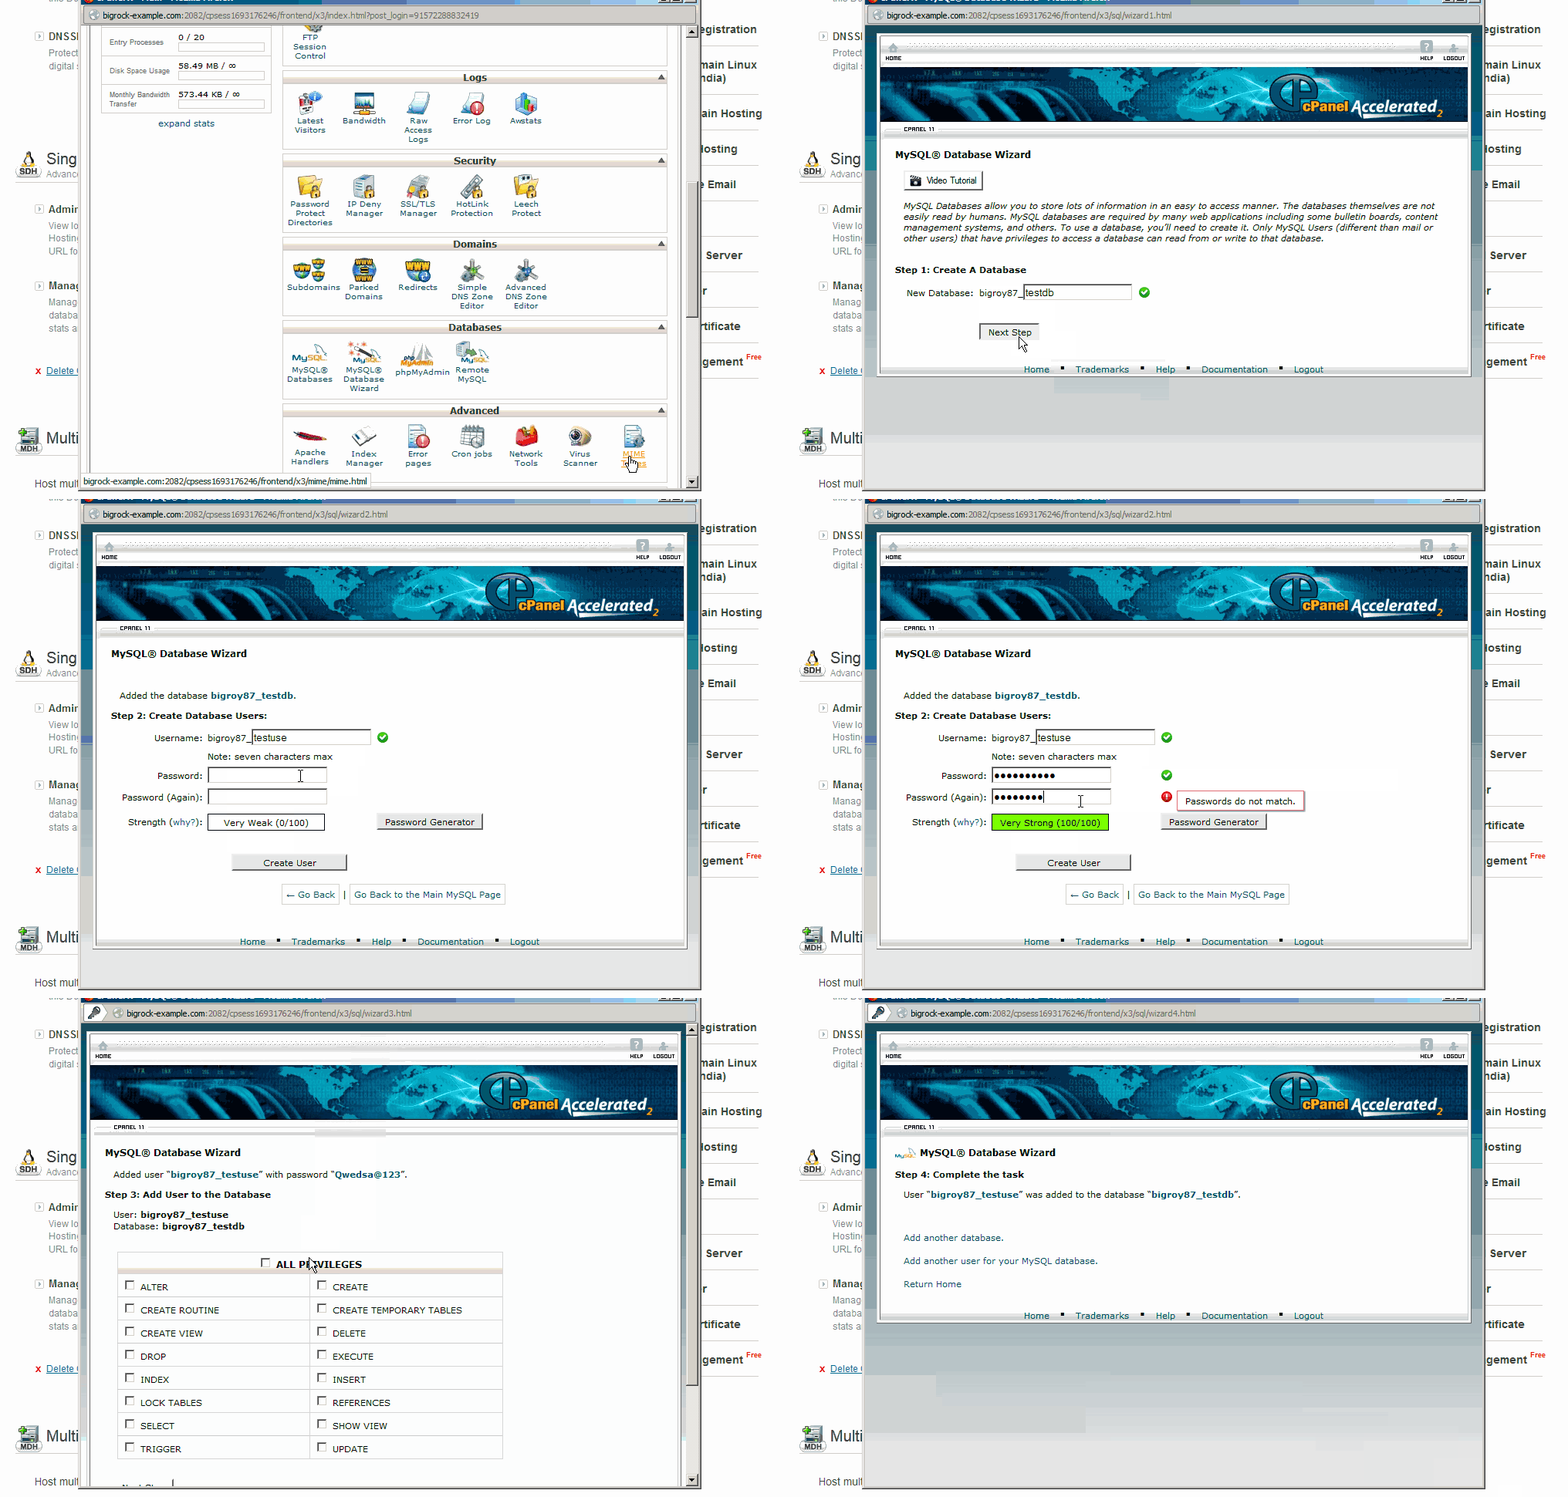
- Log into your BigRock cPanel account. Click on the MySQL database wizard to create a new database.
Next;
-
- A window will open up. Here, type in your new Database Name and click on “Next Step.”
- Enter a Username and a new Password. Click on “Create User.”
- Click on “All Privileges” and move on to the next step.
Remember to note down all the details - the database name, the username and the password. You will require these to complete WordPress installation.
WordPress Installation On Your Domain
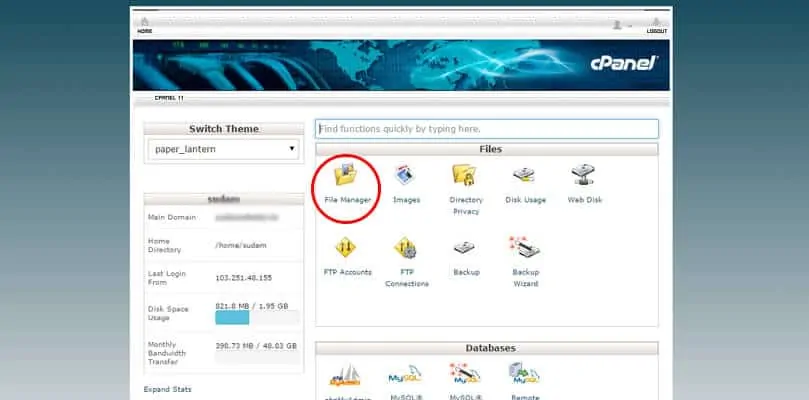
- Step 1: To upload WordPress on your domain, log into your BigRock cPanel and click on the “File Manager.”
- Step 2: A pop-up window will open, scroll to the public_html and create a directory. Next, upload the WordPress.zip you've downloaded earlier into the directory that you've now created.
-
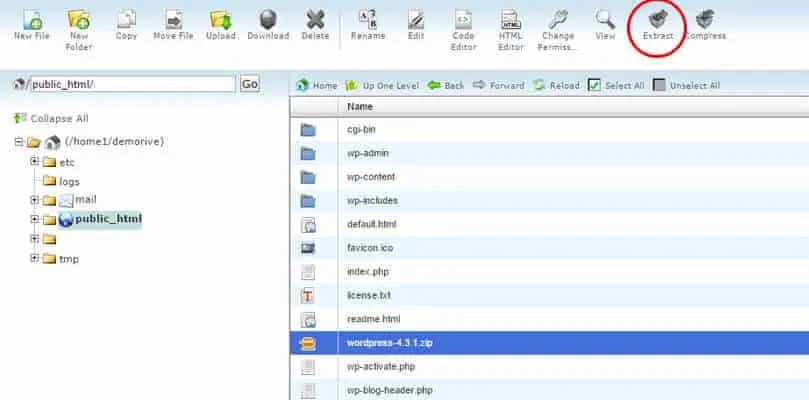
- Step 3: After uploading, extract the contents of the WordPress.zip by clicking on “Extract.” This you can find on the toolbar.
After extraction, delete the WordPress.zip package.Please Note: Make sure that the uploaded content is in the root of your domain directory. Your files will be stored in yoursite.com/wordpress if you followed the above steps. So select all the files there and move it to your main directory.
- Step 4: The next step is how to edit your wp.config.php. You will need to update the database information in it. Make a copy of the wp-config-sample.php and then rename it to wp-config.php.Click on “Code Editor” to edit its content.
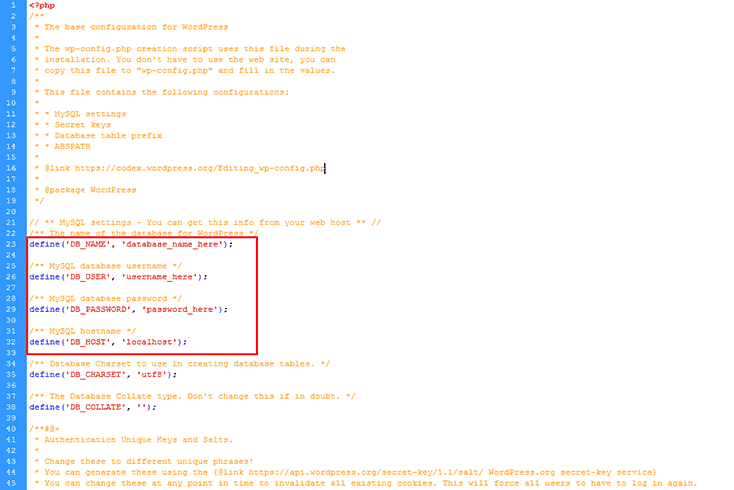
Search through the code and replace database_name_here, username_here, and password_here. (Enter the details you created in the MySQL database wizard earlier). Save the changes when you are done.
-
- Step 5: Go to http://yourdomainname.com/wp-admin/install.php (replace yourdomainname.com with your own domain name). Choose the language and continue.Now, you’ll come to the famous WordPress 5 minute install page.
Enter your Site Title, create a WordPress username, create a password and enter your email address in the space provided. Tick the privacy button and click on install WordPress. There will be a success page after the installation.
#3. Getting Started With WordPress After Installation
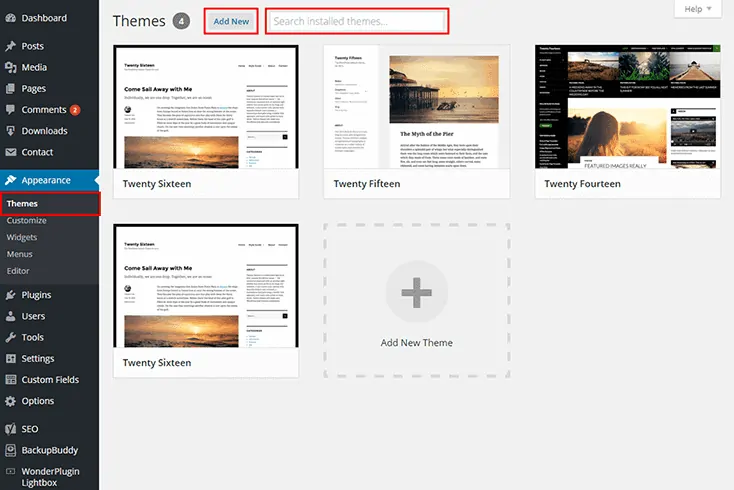
After WordPress installation, the first thing you need is a WordPress Theme. A theme is a specific layout with a colour scheme that gives your blog a distinctive appearance. You can change this anytime according to your need.
You can browse through the Free themes available by clicking on the “Appearance” tab in your WordPress Dashboard. Here, select one that suits your type of blog or the message you are trying to put across.
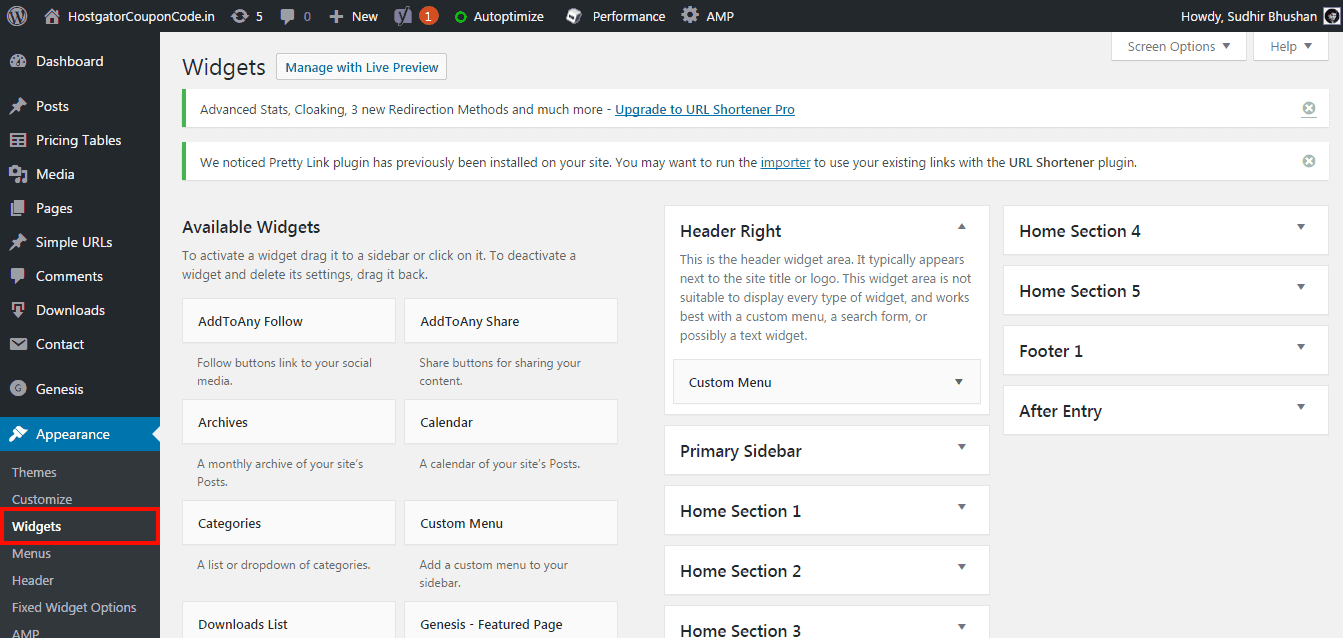
You can also manage widget in your WordPress blog. All WordPress blogs have widgets in their collections. They are mostly shown on the right side of the blog homepage. However, it might differ in some WordPress themes.
To manage widgets, go to the “Appearance” tab. Click on your blog title in the upper left side, then click on the widgets link there to change the settings. You can remove the widgets you do not want or drag the ones you need on to the right hand of the screen.
#4. How To Install WordPress Plugin
Plugins add many functionalities to your WordPress site. According to the definition by Wikipedia, a plugin is technically defined as a software component, which enhances the feature of a pre-existing software application.
It is basically a set of codes that do a specific task or function in your WordPress site.
There are lots of plugin in WordPress. Some help with on-page SEO, some adds social media sharing links & buttons to your site and lots of different tasks too numerous to mention.
The first thing to do is to make enough research on the plugins you want to use. Check their ratings, how many users are using it and the reviews of that plugin.
This is important because some plugin may make your site vulnerable to hackers, while others may crash your site. If there are no assurances that the plugin is safe to use, you can ignore it and look for an alternative.
How To Install WordPress Plugin Manually
-
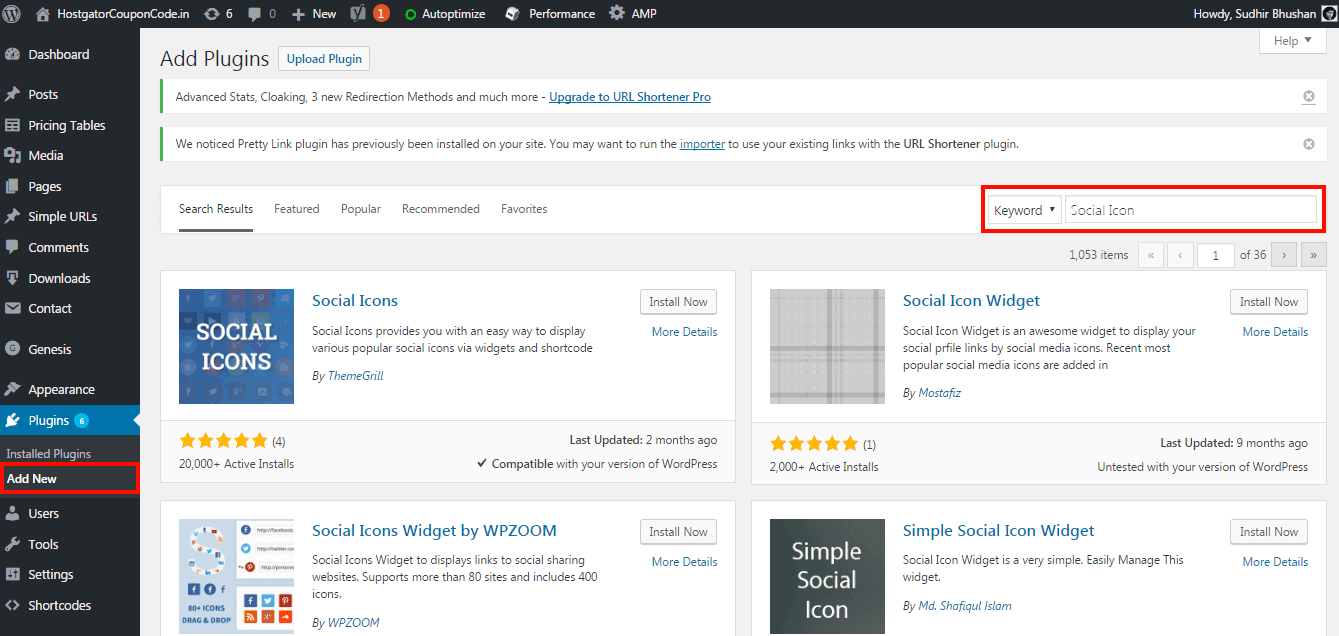
- Step 1: Open your WordPress dashboard and click on “Plugins.” Next, click on Add New or you can also search for the plugin you want.
-
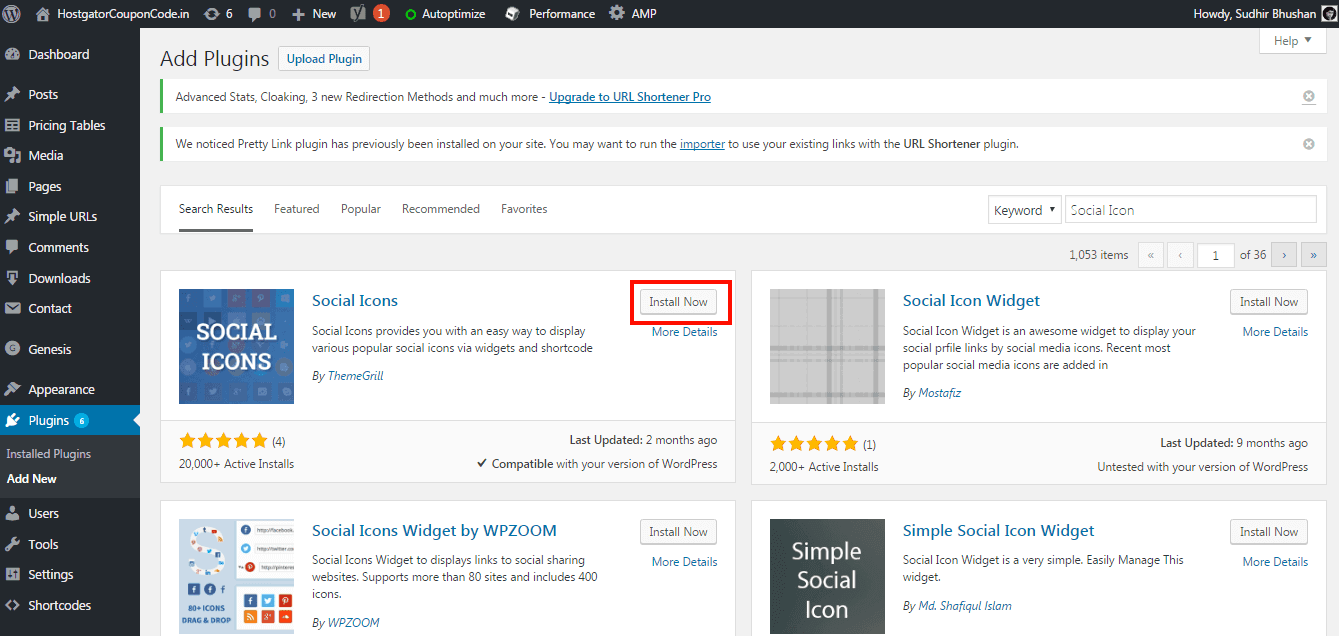
- Step 2: Select the plugin you want to install. Check if the plugin is up-to-date and compatible with the version of the theme you are using. If it is, click on the “Install Now” button.
-
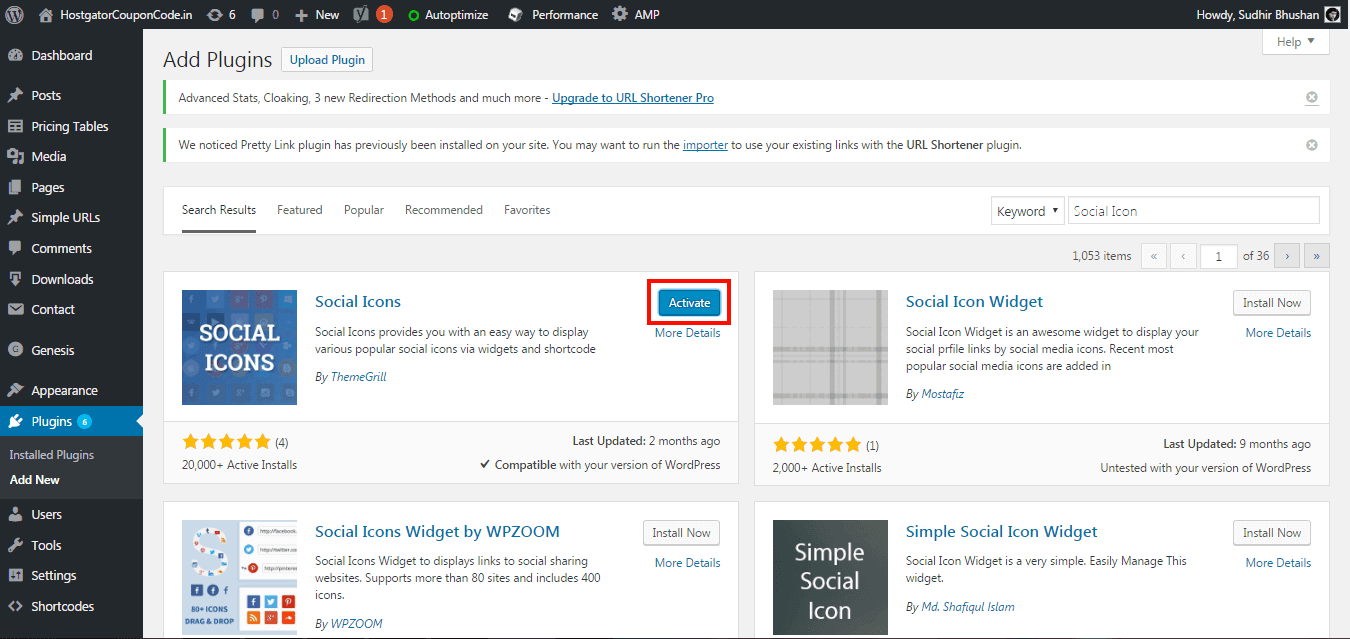
- Step 3: After installing, click on “Activate” and configure the settings if need be.
Plugins configurations and settings are different from one another. Some of the plugins add a new item to your plugin menu, while others have a link to the plugin list settings.After activation, check whether the plugin affects your site negatively in any way. If that is the case, delete it immediately. Remember; never try out a plugin that does not have many reviews from previous users.
- Step 3: After installing, click on “Activate” and configure the settings if need be.
Not sure How to Configure WordPress Plugin Settings?
Check out the video below.
It is also important to always keep your site well-maintained. To this end, here is a complete WordPress website maintenance checklist that you can follow.
#5. WordPress FAQ’s
Here are some of the most frequently asked question about WordPress around the web and their solutions.
Conclusion
WordPress is the best content management systems out there because of its ease of installation and usage, its clean platform and its overall simplicity.
We hope this article on how to install WordPress on BigRock was helpful and will make your task of installing WordPress on your site easy. However, should you have any issues during or after the installation of WordPress, you can always check BigRock's Knowledgebase or contact BigRock Support.
As always, if you are planning on purchasing web hosting, then do check out our bigrock coupon code homepage for exciting new deals & offers!
 After extraction, delete the WordPress.zip package.Please Note: Make sure that the uploaded content is in the root of your domain directory. Your files will be stored in yoursite.com/wordpress if you followed the above steps. So select all the files there and move it to your main directory.
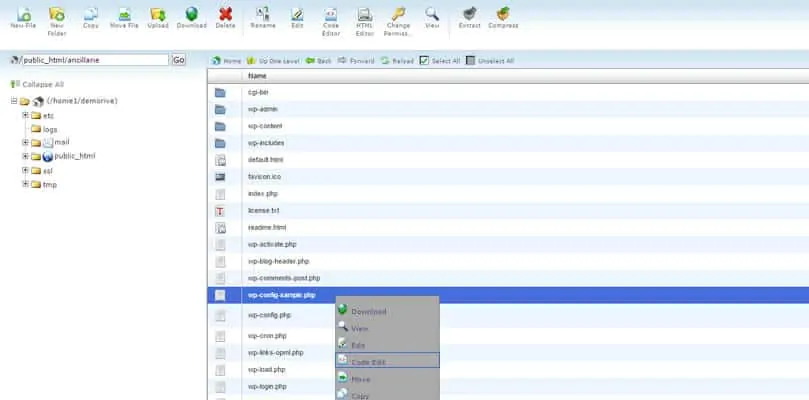 Search through the code and replace database_name_here, username_here, and password_here. (Enter the details you created in the MySQL database wizard earlier). Save the changes when you are done.
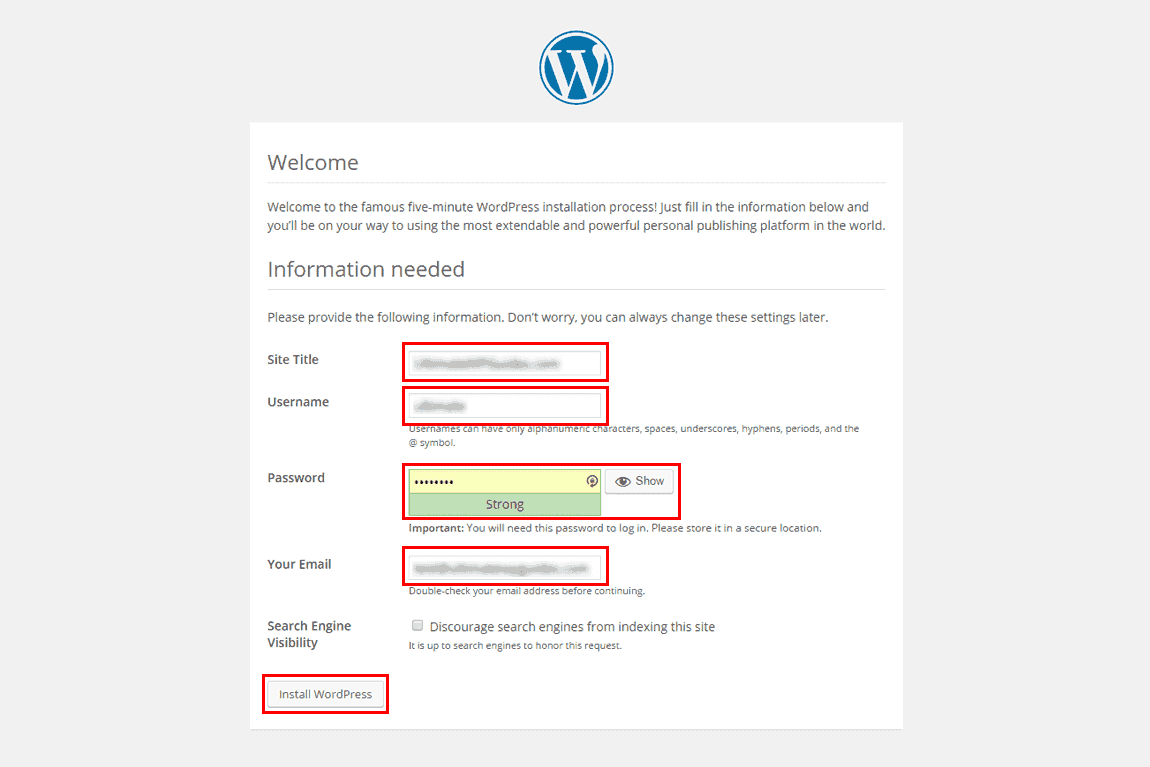 Enter your Site Title, create a WordPress username, create a password and enter your email address in the space provided. Tick the privacy button and click on install WordPress. There will be a success page after the installation.
 Plugins configurations and settings are different from one another. Some of the plugins add a new item to your plugin menu, while others have a link to the plugin list settings.After activation, check whether the plugin affects your site negatively in any way. If that is the case, delete it immediately. Remember; never try out a plugin that does not have many reviews from previous users.

Hey Sudhir, thanks a lot for adding a video to this amazing guide! I feel that a visual tutorial is always better than a written article. I am not a reading person myself and this really helped me gained the information quickly 😛
Hi Sudhir, appreciate your hard work on this detailed article. Loved the tutorial video. It is a great help for a non-technical person like me. Thank you!
Hi Sudhir, great post! However, your solution to login problem saved me! I was wondering what the issue was whenever I try to log in. As you said I enabled cookies, cleared browser cache and tried logging in… and ta-dah it worked out for me. Thanks!
Thanks a lot for such an informative post, Sudhir! Looking ahead for more such posts.